Friday, October 01, 2010

DIY - Install Paper Flooring?!?!

I was talking with my son-in-law on the phone, whom I LOVE, and was "Stumbling" while talking....and up came this very surprising and super economic way of putting down durable flooring in your home!!  I could hardly believe what I was seeing in this video, but thought it was way cool!  Not sure just where I'd use it, but let's see what you think!:


Do-It-Yourself Alternative To Hard Wood Floors - An Oregon Cottage


http://www.youtube.com/watch?v=MvR2pfSdrmw

Want to rip out your ugly carpet but don't have the money to put in hardwood flooring? Using this simple DIY technique, you can give your floor a faux leather look...

Wednesday, September 29, 2010

homeschooling vs. public school stats

I am so pleased and fascinated to see this chart of research results about homeschoolers as compared to public schoolers, created by degreesearch.org!  I'm not at all surprised at these stats, but so glad to see them being published.  I found it on http://www.adventuresinhomeeducating.blogspot.com/, as shown below in the link.  I couldn't get it to go on here right, so if you want to be able to click on it to enlarge it, you will have to go to this blog.....but she has a great homeschooling site anyway....a story of her own adventures, that you may enjoy visiting!

http://adventuresinhomeeducating.blogspot.com/2010/09/homeschooling-by-numbers.html

Some very interesting numbers.


Sunday, September 26, 2010

VICTORY!!!!

ok, well,...........I just HAD to!!!!!!!!!!! (put this on here, I mean)

I USED........


EVERY......
SINGLE........


CHAIR!!!!!!!

VICTORY!!  HA HA!!!  Poor little Sonnet was getting so nervous, as I built this that she almost knocked it over with her suspense!!!  Just another fun Sunday night for us!  ;)

Friday, September 24, 2010

Healthy, Simple, Productive, Living Homeschooling

Your experience in pursuing and learning about what you love is a perfect example of what healthy, simple, productive, living homsechooling should look like. That is the heart of healthy homeschooling. Just the way you felt the desire to do it, took action, provided what was needed, followed directions, and became "more" than you were before......that is exactly what all people, especially kids, need to do, and it is the real definition of education.....NOT the canned stuff in the schools. 

*****(Here I will note that although I think homsechooling is better for many, I do realize there are lots of people who can't homeschool, or prefer public or private schools, and that is fine.  Unless you are lead differently, stay in the place where God has you.  :)  These principles and ideas will enable kids in any situation to really take off and fly!!)*****

We need to learn to trust God for what He has put into our hearts to pursue and learn. He has a plan, and so of course He has sown the all the seeds we will ever need into our hearts for that plan to come to fruition. These seeds are in the form of interests, bents, passions, desires, abilities and talents. We just need to listen to Him by seeking Him out, and He will reveal what is in our hearts to us so we can water, weed and tend them....layer by layer and season by season. Before we know it, we are becoming the unique individuals He means for us to be! And all without ever worrying about what the public schools are doing, or what anyone else is doing, or about the dreaded possible "gaps" (e.g., Oh no!  What if they miss out on something!). Common sense says we will need certain basics, but learning/doing those won't take more than an hour or so each morning for elementary age kids. The rest of their day should be free for them to pursue what they are interested in, and love!  (Older kids may need more academics or may not, depending on what their interests are.)


We did this in our home in many ways. Of course I had a rule that they had to be actively pursuing/learning something (except for breaks/lunches) during the school day. Can't just sit there and polish your nails!! Then, whatever they found that they were interested in, I provided everything I could for them to pursue it. If their interests changed, that was fine, and they did change many times.....but certain things really began to stand out as consistent interests, and we went with them wholeheartedly. They gained some expertise at a very young age, at several things. They began to see what some of their life-purpose might be, sort of like watching a muddy picture clear up, over the months and years of their homeschooling, as things that are not really relevant to their lives sink to the bottom. For both of my older girls, they knew by the time they were young teens what they wanted to "be" when they grew up, and in fact, they were already "being" it!! For my 15 year old son, it is not taking shape as fast, but a real deep interest in science is developing, along with an interest in running his own business. Sonnet, who is just 8, is already very deeply involved in music and dance, but more "mud" will need to clear away of course.


Another comparison might be watching a sculptor expose the lovely statue inside of a block of marble!! Whatever is "not" the statue is simply chipped away!! What the statue "is" is what is revealed! Yes, God could just instantly do all this for us, but He wants us to enjoy the process, and He teaches us many things along the way that can only be learned through this hard work. We must work out what He has put in.


This whole process is extremely retarded, if not downright killed in the public schools. It is often choked with superfluous, burdensome things, and busy-work, much of which is imposed on teachers by red-tape requirements that all but guarantee that any creative process or real learning is smothered.  The dread disease of boredom sets in, with accompanying feelings of being overwhelmed and helpless, as the mountain of  "school work" is faced by both teachers and students. 

It is also choked by the social pressures to conform to what/who is currently popular and to fit in. The social life of the average public schooler is often the only thing that matters to them, and it is just as often not a healthy social life. I do know that there are some excellent public shool teachers out there who give themselves sacrificially to really love and help their students, and in those classes, much real learning takes place. My Mom was one of them. But the "system" is all wrong, and is getting worse, not better. It's like trying to chip away at your statue with a butter knife and a thousand monkeys crawling all over it all the time! Any real success there is had in spite of the public school system, not because of it.

Yet this process (of discovering who you really are/are meant to be) is the very thing kids are supposed to be getting through their public school "education".


Homeschooling won't be any better if all we do is imitate the public schools. The system needs to be trashed, and we need to go to God to realize what education should look like. It is so simple. All we need to do is follow His principles!! These are principles for life, not just learning.   I'll do that in the next homeschooling post.

Monday, September 20, 2010

Sumthin for those Beanbags!!

Something was bothering me in the back of my head, and on my walk it wiggled its way up to the front!!  We needed something to pitch those beanbags in to!!  So I thought up this, and Sonnet helped me put it together.


We had this "indestructable" plastic tray I got at a garage sale here (remember we're talking about a gift for 3 little boys!)  But you could also use a sturdy cardboard box, cut down to size.  We cut out the targets from pieces of felt, and wrote on them with a permanent black marker, then hot-glued them on.  Of course Sonnet beat me, and cackled with glee when we played it, the little doodle-head!!!

I sewed up a cover to go around the outside by measuring around it, and measuring the height from top to bottom.  The length around was too long for the fabric I had left, so I cut 2 strips and sewed them together.  The height was 2.5", so I cut the strips 6" wide, so I could just fold them in half, right sides together and stitch down one end and one side.  Turned it right side out, ironed it flat, and stitched up the other end, then hot-glued the whole thing onto the outside of the box.  Here's how it looks where I joined it...it's just overlapped.


I know, it seems strange to be giving this as part of a baby gift, but he has 2 brothers, ages 2 and 4, and he will grow old enough to use this very fast!!!  Too fast.  ;)

That's a Baby Gift?!

Yep, it is!!  I decided to make a little wall decor. for my neighbors' playroom wall instead of doing the traditional type of baby gift.  They have 3 little boys now including their new baby boy, and the room has lovely blue/green curtains.  I just happened to have this frog fabric, and some green too, sitting here.  So......

It was super easy to make!  I just cut out the triangles with pinking shears.  I used some Maxi Piping I had laying around (see pic below), with ric-rac sewn onto it for the "rope" to hang the flags on.  After laying out the flags on the piping to make sure I had enough room not only for the flags, but also for some little bows at each end, I sewed the ric-rac onto the piping.  Then I sewed the flags on and tied the bows!  That's it!

You can use seam binding, or just clothesline for the "rope".  You could hotglue ric-rac onto it, and hotglue the flags on, and then it becomes a no-sew project.


And Sonnet got busy with the extra frog fabric and made these wonderful little beanbags for the 3 boys!  She, at age 8, is becoming a regular little seamstress!!

Sunday, September 19, 2010

CHRISTMAS PLANNER

Being in the 100 Days to Christmas now, I thought I'd blog my own Master Christmas List, or Planner that I keep on my computer.  Feel free to print it off. Some of the formatting got messed up from my original, but it's readable.  For anyone wanting a cleaner copy, I'd be glad to email a copy of my document if you desire.


Mom's Christmas Memory Book!
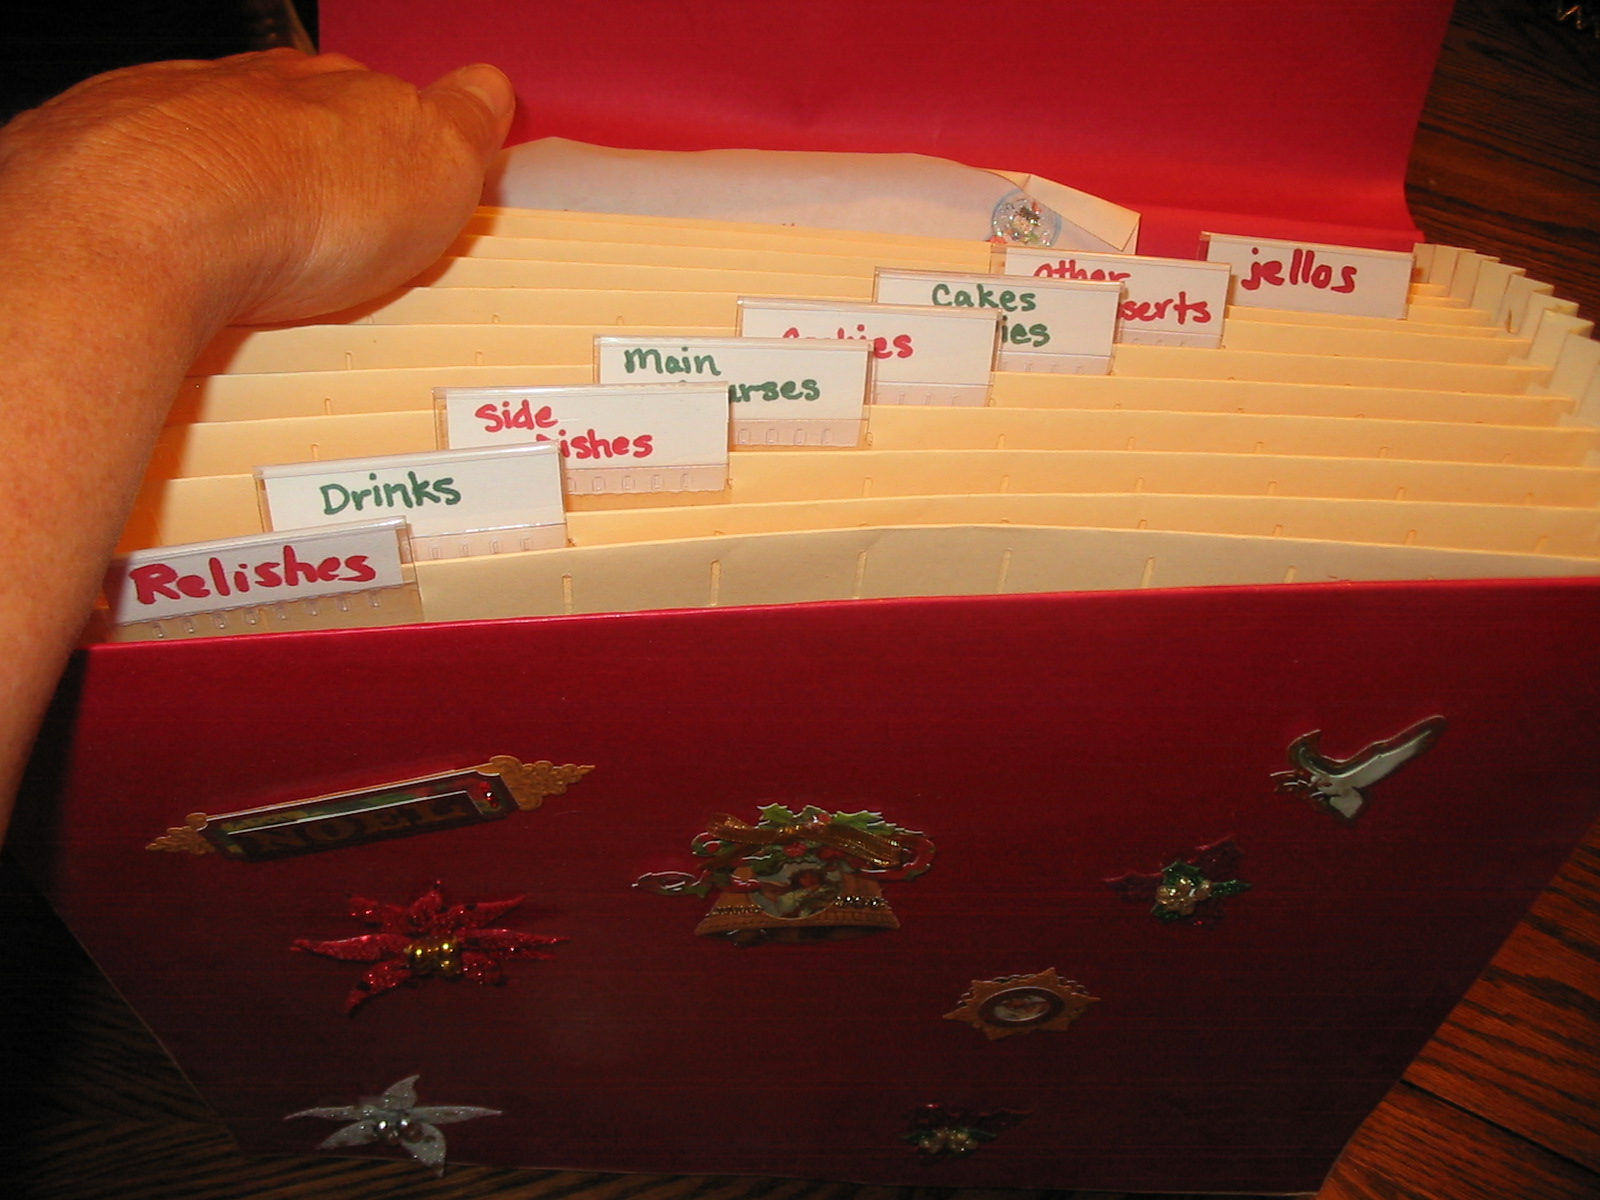
 Here are pictures of Mom's Christmas Memory Book and Shasta's Recipe File, as mentioned in my planner.

Inside the front cover
Inside back cover

Shasta's Recipe File
Inside tabs of Shasta's file


MY CHRISTMAS PLANNER

There should never be a time when we consider putting God “on hold”. Real vitality and productivity come only from Him, and without Him, all is confusion and loss. He should be praised every day, no differently now than always. We don’t ask Him to bless our activities, but to bless, express, and satisfy Himself in us….and thereby we are blessed! 

In order not to “re-invent the wheel” each year, it makes sense to take time to set up a system for Christmas. It can be changed or added to each year. Good planning is a godly principle. 

  
NOVEMBER OR EARLIER 

1.  Make a Christmas Planning Notebook or Binder. See http://100daystochristmas.com for info on how, or do a google search. Use www.listplanit.com for pre-printed lists, or make my own. Martha Stewart may have stuff too. Here is a summary of what I currently keep in mine:

  • Ideas pages for decorating, gifts and crafts.
  • Recipes
  • Pages for memories of years past (Mom’s Christmas Memory Book). This includes old Christmas letters I’ve sent out, pictures, recipes I want to archive, past year’s planning pages, Christmas stories of ours, and stories from magazines.
  • Calendar.
  • Other things that could be included: table of contents, budget page, party planner, including day-of-party-timeline, received gifts list, thank you note check list, Christmas plays, magazine clippings, New Year’s stuff
  • Lists:  
    • gift ideas to make or buy this year- my own wish list (so people know what to get me!)
    • people to buy or make gifts for, what gift, whether I have it, or still need it, and whether wrapped.
    • stocking stuffers
    • people to send cards to
    • cookies/baking (recipes, mixes or dough made) (use Shasta’s recipe file)
    • holiday dinners (recipes, menu) (Shasta’s recipe file)
    • sewing/craft projects
    • people who will receive small gifts or goodies
    • activities I want to put on calendar


2.  Write up a Christmas letter in email to send out, with downloaded pics. Print copies of it off for people who don’t use email and send them cards for sure. Or do cards for all.


3.  Buy Christmas stamps if sending cards.


4.  Keep working on sewing and craft projects. Designate time each day if possible. Put on beautiful music, light candles….make it a wonderful time!


5.  Decide on what cookies and candies to make and pull recipes now. Many types of cookies and/or dough freeze well. Mix up the dough several weeks ahead and freeze. For cookies that have dough I can’t freeze, measure all the dry ingredients and put them in a plastic bag in freezer (can be done several months early)! Label bag. Keep a list in my Christmas Planning notebook of what I’ve done, and how much.

6.  Put Christmas themed paper plates, cups, and plastic wrap on shopping list if needed.

7.  Get out Christmas music

8.  Make or buy Christmas ornaments for kids and Mom.

9.  List people who I would like to give small gifts, goodies, or just something extra to. Plan what I’d like to give them and get or do it.

10.  Get any special outfits ready to wear, for parties or other events. Check on what Bobby and Sonnet have, and buy something if needed.

11.  Set up wrapping station. Wrap gifts that I already have. Tape on notes with name and item. Don’t use sticky notes. They will fall off! If you are afraid people will see the notes, tape notes on upsidedown. Tell them not to look!!!

12.  Keep my list going (in My Documents, for privacy!) of what I have bought, what is wrapped, what is still needed. Keep a list of stocking stuffers. Never buy, or wrap a gift without writing it down on the list at once.

AFTER THANKSGIVING


1.  Put up outside decorations.

2.  Put up lights, outside and in.

3.  Get out advent calendar.

4.  Keep wrapping gifts as I go, and labelling.

FIRST WEEK OF DECEMBER

  
1.  Find out where Santa will be around town! Bring camera.

2.  Decide on menus for holiday dinners and get out recipes. Put needed things on grocery list.

3.  Keep wrapping presents as I get them!.

4.  Bake some goodies!

5.  Decorate the house!

6.  Do Christmas crafts

7.  Make gingerbread house

8.  Sing/play Christmas carols, watch movies, read stories

SECOND WEEK OF DECEMBER

   
1.  Early in this week, buy the tree and decorate.

2.  Bake some more goodies!

3.  Do more Christmas crafts!

4.  More Christmas carols, movies and stories!

5.  Make sure house is cleaned and beds ready for guests.

THIRD WEEK OF DECEMBER

   
1.  Keep having fun!

2.  Finish up gifts, baking, and everything.

3.  Deliver goodies to neighbors and friends.

4.  Drive around and look at Christmas lights.

5.  Set out a tray full of hot chocolate, tea, marshmallows, candy canes, cups, etc.

6.  MERRY CHRISTMAS!!!

AFTER CHRISTMAS


1.  Get out New Year’s stuff.

Thursday, September 16, 2010

100 Days to Christmas site!

100daystochristmasbanner

"miss little-red-Christmas-hood"!
I am so glad to see 100 Days to Christmas again!  I joined this really fun and helpful site last year and got lots of ideas and encouragement from them!  It really brings a little of the spirit of Christmas into my days, and inspires me to think ahead and actually do things to prepare, giving me a more relaxed and filfilling holiday.  We celebrate the birth of Jesus increasingly without commercialism and really enjoy making things for each other.  This site helps so much with that.  It has groups you can belong to for sharing of ideas, and is full of gifts you can make, crafts, decorating ideas, organization, and the "little-bit-each-day" which leads to peace, and time for things like "miss little-red-Christmas-hood" above!

Monday, September 06, 2010

Workbench and dogdoor problem solved!

We have a small dog and cat, and of course, a little door for them, leading onto our back porch.  We also had a huge problem, as the wind blows from that dirction often, bringing lots of cold air, dirt, leaves, etc., into the dogdoor.  The flap broke off, and attempts to rig up a flap that worked failed.  Enter:  my genious husband again!!!  Here is what he did....let's see if you can figure out what happened here....no looking ahead!


"something dumb this-way-comes!!"

Well?!  Didja?!?  Figure it out, I mean?!  See that place where one of the planks does not extend to the ground, just off of the deck?  THAT is the new entryway into the dogdoor area!!  They go under there, jump up onto the deck, and come in their door, which is now protected behind/under this wonderful workbench!!!!  You have to admit that this is GENIOUS!!  Eventually, we will probably build new steps with a bigger platform, so that you can stand on a level withthe workbench all the way down (on the right), and then descend the steps.  Yes, we will have to leave room under the steps for the animals to get through.  :)

trash corral

Now for the other backyard projects we've been doing!  We've made a trash corral, using a structure we already had for the base of it (not sure what the original use of that structure was....we got it from a deserted storage unit), and added some fence planking to "hide" the cans and make it look purty!  This is the side you can see from the house and backyard.  Beyond it, are the woodpile, and some of our field.
Now our cans are "corraled" so that the wind can't blow them around!  Yay!!

Treehouse!

And now.....the reason I have been absent from here for awhile......We have been SO BUSY, building the most wonderful TREEHOUSE!!!  My husband is a genious kind of guy, who thinks up all these things to do right out of his head....truly creative!  The platform is 14 feet up off of the ground!  Here's some pics:
silly helper!


under construction


my genious at work!

finally finished, with platform, house, and walled rails!
Sonnet cleaning her house!!

We worked SO HARD on this for days and days in temps reaching 104 degrees sometimes!  But we had a blast, drank lots of lemonaide, and learned a lot!

Jinglebell Jack!


Meet Jinglebell Jack!!  He is a bold sort of fellow, full of hijinx and cleverness!  I made him when my older 2 girls were little, because we had a book by the same name, about this wonderful little clown that a Mom made for her little girl after they had seen the clown in a circus.  It made them so happy to have a Jinglebell Jack of their own!

Here is a picture of him with his book:


and another showing some of the cute pages in this little vintage wonder:


I made him in much the same way as my Mom made the little button doll shown in an earlier blog.  Of course, instead of the buttons, I made lots of little fabric yo-yo's from circles I cut out of remnants I had on hand.  I also had to embroider his face on.  I did this just by looking at his picture in the little book, and drawing his face onto some fabric. 

He loves his own book, as you can see here:


The other day, I found him to be quite fallen apart, from much playing (he had overexerted himself!), and sitting right by him was an old fashioned dolly that had lost her head!  I think she may have just been in love with Jinglebell Jack, and was overcome!  Anyway, I fixed them both, and here is their happy owner now with them:

Tuesday, August 17, 2010

Introducing.....MY MOM!!.....and her sewing wreath, button pic, and button man

My Mom, class of '55!

Any creativity I have should be credited to the amazing creative brain and spirit that my Mom was given, and was handed down to me.  She has always been the most creative person I've ever known, and when I grow up I hope to be just like her!

Here are some things she made and gave to us:

Well, she didn't make the horse tack, but I thought it was too cool to leave out of the picture!


close up of Mom's wreath

She just took a small grapevine wreath and a hot glue gun, and went to work with some antique sewing supplies she had.  She used paper ribbon to wrap around the wreath first.  It also makes a nice backdrop for the wreath.  Notice the old belt buckle holding the paper ribbon together at the top, and acting as the base for the simple wire hanger, shown below:


This may be hard to see.  The wire is firmly attached to one of the heavier vines on each side near the top, and goes up and is looped around the back of the belt buckle in 2 places, with some left at the top for hanging.......all cleverly hidden behind the lovely sunflower ribbon.

mom's button picture

I love how she used an old doily on the top right, and the beauty of her proportions and arrangement.  For the background, she just glued fabric onto cardboard.


mom's button "manny" for Sonnet!

When Sonnet was a baby, Mom made this cute little button manny.  The eyes and mouth are painted onto a black wooden bead, which she also painted.  The nose just looks like a little red plastic circle she had from something, but could be made out of clay, or even painted cardboard, covered with polyurethane.  It's just glued on. As for the sewing together of the buttons, that is a bit harder.  The buttons at the bottom of the legs and arms are shank buttons.  (This means they don't have holes through the top, but instead have a "shank" underneath, with which the button is attached.)  She started with very heavy duty thread, probably meant for sewing carpets or upholstry, and sewed long lengths of it onto those 4 shank buttons. 

At this point, I go into guessing:  She then sewed the threads up through 2 holes in each button to form the legs and arms.  She then sewed the threads up through the body buttons, through the head and hat, tying them off to hold the hat in place, but also leaving a long loop for hanging, if that is desired.  The attachment of the arms was probably done by just tying them on at the right place on the body.

Don't I have a wonderful Mom?!?!  ;)

Sunday, August 15, 2010

Sunday Thoughts

This blog is about creativity in every day life, and that includes thoughts about the Source of all creativity, our Lord Jesus Christ.  Here's what I have been thinking this morning:  I have been questioning, of late, what I really EXPECT Jesus to do. I've realized that my expectations have been far too low! He is ready and willing to express Himself in miraculous ways in every unpleasant circumstance, in every difficult relationship, in each repugnant or humiliating thing we bear. So often, I give in to anger or self pity, and quench the Holy Spirit immediately. The moment I choose to obey LOVE, He jumps to the forefront and acts!!! This is the very thing He longs to do for us all our days and the reason we are still here on earth.........that He may express Himself through us, and we may be known by our love...........which is His Love! This will not happen if I am merely obeying rules, or even Scriptures. I must not make Jesus less than He is. Obeying anything but the Person of Pure Love is missing the mark, and will lead to frustration, failure and a constant feeling of being overwhelmed........or WORSE: becoming a self-righteous prig. Obeying LOVE makes us "useful" every moment of our lives, especially in the most difficult moments.

Friday, August 13, 2010

Photo Editing and Repurposing a Pillowcase into a Purse

***update***  Photo Pos Pro quit on me.  Too complicated to explain.....but I found Picasa!!!  It can do almost everything Photo Pos Pro can do, and is actually MUCH easier to organize stuff with.  I absolutely LOVE it, and can't recommend it enough!

It took a lot longer than I had intended, but I've finally found a free photo editor that I like:  Photo Pos Pro!  And have played around with it a bit.  Here are 2 examples of some things it can do:

This is the "before" image (of my daughter, Sonnet!)


....and this is the altered image!

Note the black background, color corrections, sharpened image, cropping, and cute color frame.

Before (of our cat, Marvin, poor thing!)


After image

Note the same things done as in Sonnet's pic, but also my daughter Summer (who is holding the cat) had a blue watch on in the 1st pic, but it isn't there in the 2nd! 


I'm not very good at using all the stuff in this program yet, but like everything worthwhile, it will take time.  I learned how to do the things in these picture modifications by just clicking on icons, and occasionally going to the help files that are very well written.  You can do the same! 

If you want to download this great photo editing program (Photo-Pos-Pro), it is available here:


This is actually cnet's website, and they give it a great review!

This is one more step toward my being able to comfortably and effectively use my camera to augment this blog! 

Here is an old project I did, which I just created without a pattern, and could not re-create now if you paid me (well, ok, maybe if you paid me ENOUGH, lol!).  To begin with, it was a garage sale find:  2 quilted pillowcases and a matching quilted bedspread.  My 2nd daughter, Summer, used them for years, but they finally began to tear apart a little.  So.........I did something else with one of the pillowcases!

Here's a pic of the original pillowcase:


Now here's my lovely Sonnet, with her brand new purse!!


It is fully lined with some blue fabric I had laying around.

(By the way, there was some trash on the seat beside Sonnet that I didn't see when I took the pic, and I used my new photo editor to paint over it!  ;)  )


This purse was lots of fun to make, and Sonnet loves it!  You can re-purpose old fabrics too.  Either make up your own pattern, or if you don't like the thought of that, there are free patterns for purses and many other things to be found on the web.  I've seen some really cute ones, both for free, and for sale on different sites.

Monday, August 09, 2010

Pandora - Free Radio Stations You Create!

Tomorrow, I go on a journey to learn how to take great blog pics, download them, and tweak them up so I can do tutorials!  I'll blog the journey as I learn......as a tutorial!!

Couple of other "journeys" coming up too.  I'm going to learn how to tile in the upstairs bath. and will watch/learn how to texture the walls as a friend does it.  Sounds like more tuts!

I'll leave you with another of my very most favorite things:  http://www.pandora.com/.  If you love to hear beautiful music while you work, try them out!  They are completely free (at the basic level).  I've created a few really great stations, and they give me such peace!!  Here is what they say about themselves:

About Pandora®


When was the last time you fell in love with a new artist or song?


At Pandora, we have a single mission: To play only music you'll love.


To understand just how we do this, and why we think we do it really, really well, you need to know about the Music Genome Project®.


Since we started back in 2000, we have been hard at work on the Music Genome Project. It's the most comprehensive analysis of music ever undertaken. Together our team of fifty musician-analysts has been listening to music, one song at a time, studying and collecting literally hundreds of musical details on every song. It takes 20-30 minutes per song to capture all of the little details that give each recording its magical sound - melody, harmony, instrumentation, rhythm, vocals, lyrics ... and more - close to 400 attributes! We continue this work every day to keep up with the incredible flow of great new music coming from studios, stadiums and garages around the country.


With Pandora you can explore this vast trove of music to your heart's content. Just drop the name of one of your favorite songs or artists into Pandora and let the Genome Project go. It will quickly scan its entire world of analyzed music, almost a century of popular recordings - new and old, well known and completely obscure - to find songs with interesting musical similarities to your choice. Then sit back and enjoy as it creates a listening experience full of current and soon-to-be favorite songs for you.


You can create up to 100 unique "stations." And you can even refine them. If it's not quite right you can tell it so and it will get better for you.


The Music Genome Project was founded by musicians and music-lovers. We believe in the value of music and have a profound respect for those who create it. We like all kinds of music, from the most obtuse bebop, to the most tripped-out drum n bass, to the simplest catchy pop tune. Our mission is to help you connect with the music YOU like.


We hope you enjoy the experience!

Sunday, August 08, 2010

Tommy Emmanuel and galloping ideas!

Sing it with me......"don't know much about .............bloggery!!"  This world is new to me, though I've always loved to write.  I have a thousand ideas running around in my head for things I'd like to sew up and sell on Etsy, or on my own website!  I'm thinking of endless party banners and a lot of other things. 

The only other thing rolling around my head is the wonderful sound of Tommy Emmanuel!!  If you haven't heard of him, you NEED TO!!  All the best guitarists are saying he's the best that ever lived!  Here's a link of him doing "Classical Gas"....aw c'mon, it's only 4 minutes!!  You'll LOVE IT!!! 

http://www.youtube.com/watch?v=zBEbYXa6Cik

Well, It's time to lasso up my brain for the night!  ;)